AI Flooring Takeoff: Scoping, Quantities & Estimates
By Floor Plan Analyzer, an AxcelerateAI practice
A useful flooring takeoff connects finish zones to the right schedule, documents deductions and keeps measured quantities separate from purchasing assumptions. A single floor-area total cannot do that.
This guide follows the full handoff from document scoping to measured quantities and commercial estimating. It includes original worked examples, a quantity CSV and a scoping/clarification CSV. Project identities and confidential drawings are not reproduced.
How does AI flooring takeoff work?
A custom pipeline selects relevant plans, reads finish codes and schedules, proposes scaled finish-zone polygons and links them to reviewable quantity records. Estimators verify boundaries, deductions, base and transitions before applying product-specific waste, pack rounding and prices. Missing specifications and site conditions remain explicit exceptions.
- Measure by finish zone, with source evidence and revision identity.
- Keep net area, base, transitions and purchasing rules separate.
- Review unknowns before releasing quantities or ordering material.
Download the fictional flooring takeoff review CSV
Begin with the finish scope, not the building footprint
A flooring takeoff answers which finish goes where, how much surface is included and what additional work belongs in the price. The building footprint cannot answer those questions by itself. A room can contain more than one finish, an open space can span several room labels, and a finish boundary may stop at a threshold rather than a wall.
Agree the deliverable before analysing the set: room or zone areas by finish code, wall-base lengths, transitions, source references and unresolved items. Keep preparation, removal, underlay, adhesives, installation allowances and procurement as separately defined scope. An area extraction is an input to estimating, not a complete flooring quotation.
Floor Plan Analyzer is AxcelerateAI’s specialist practice. We fine-tune models on your drawings and engineer the review and export around your workflow. This guide describes how to scope that work; it does not offer a universal self-service flooring price book.
Scoping, takeoff and estimating are three different handoffs
Before drawing linework, an estimator builds a map of the project: which documents define the trade, which products appear, where they are installed and what is missing. The scoping output is a navigable evidence package and material register. It is not yet a set of measured quantities or a priced bid.
Takeoff then adds checked areas, lengths, counts and location records using that scoped evidence. Estimating applies the selected product, layout, purchasing, preparation, labour and commercial rules. Keep these handoffs visible in the software. A correct material tag can still lead to an incomplete estimate if a backsplash elevation, wall-base condition or transition note was never scoped.
Useful deliverables include an annotated scoped PDF for navigation, a material-verification register, an exception/RFI log and a quantity export. A scoped PDF should preserve original sheet identities and issue information. Markups that identify relevant content should not imply that every highlighted item has been measured or approved.
| Stage | Output | Release question |
|---|---|---|
| Scope | Relevant pages, material identities, linked details and missing information | Do we know what must be measured and what remains unresolved? |
| Takeoff | Geometry and quantities with evidence | Can another estimator reproduce the measurement? |
| Estimate | Cost build-up, allowances, exclusions and commercial terms | Are purchasing and pricing assumptions explicit and authorized? |
Which documents does an AI flooring takeoff need?
Start with the current architectural and finish plans, room-finish schedules, finish legends and relevant specifications. Add detail sheets where they explain thresholds, coved bases, stair finishes or changes in level. Confirm the building, level, phase and selected alternates before measuring. A finish schedule from one issue must not silently classify geometry from another.
Shortlist relevant pages from the package and record why other views were excluded. Use elevations and details as supporting evidence rather than counting them as additional floor areas. A reflected ceiling plan can contain room names but usually does not define the floor finish scope. Preserve page identity and revision so an estimator can check every exported line.
| Input | What it contributes | What remains to verify |
|---|---|---|
| Floor/finish plan | Zone geometry and finish boundaries | Selected issue, scale and overlapping views |
| Room-finish schedule | Room IDs and finish assignments | Multiple floors, duplicate IDs and conflicts |
| Legend/specification | Finish code meaning and product requirements | Applicable product, thickness and installation method |
| Details/addenda | Thresholds, base and changed scope | Which plan or schedule entry is superseded |
Distinguish a material schedule from a room-finish schedule
An interior finish schedule is primarily a material dictionary: mark, manufacturer, collection or style, colour, dimensions, thickness, location notes and related requirements. A room-finish schedule answers a different question: which floor, base and wall finishes apply to each room, sometimes separately by wall orientation.
One may be available while the other is absent. A finish plan can embed floor/wall/base indicators without a separate room schedule. Preserve that source type. Do not report an embedded room tag as a recovered table, and do not mark the entire project unscopable merely because a dedicated room-finish schedule is missing.
Record unavailable, not applicable, not located and conflicting as different states. Not located means the system has not yet found the evidence; unavailable is a reviewer-confirmed gap in the supplied package. Neither is equivalent to no work. If the team adopts an allowance or provisional pattern, store its author, date, basis and approval state as an assumption, not as an extracted design fact.
Build a material-verification register before assigning purchase rules
For every in-scope mark, preserve the raw schedule entry and verify the manufacturer, product/style identifier, colour, format, thickness and intended location against the correct product information. Save the reference and date checked. A manufacturer page helps verify product attributes; it does not authorize a substitution or override the architect’s selection.
Check whether a quoted dimension describes an individual mosaic piece, a mesh-mounted sheet, a plank or a pack. A sheeted mosaic can have small constituent tiles inside a larger module. That distinction affects tile ordering, pattern interpretation and grout calculations. Keep piece dimensions, sheet dimensions and pack coverage in separate fields.
Shaw’s Process Tile page, for example, identifies an 18 by 36 inch format and displays several installation-method examples. Those options do not establish which method the project selected. Preserve a missing project pattern as a question or an estimator-entered provisional assumption. Do not infer it from the first product image.
| Field group | Capture | Review trigger |
|---|---|---|
| Identity | Raw mark, manufacturer, style/model, colour | Near-matching product or conflicting identifier |
| Geometry | Piece, sheet/module, thickness and pack coverage | Different dimensions across schedule and product page |
| Installation | Pattern, orientation, start point and relevant notes | Product supports several methods but project specifies none |
| Ancillaries | Base, grout, trim, sealer and preparation references | Related material is mentioned but not fully specified |
References: Shaw Contract: Process Tile product dimensions and installation-method examples
Read finish codes, hatches and room labels together
Treat a hatch as evidence to interpret through that drawing’s legend, not as a universal material dictionary. Similar patterns can mean different things in different sets. OCR can propose room numbers and finish codes; segmentation can propose zone boundaries. Linking the two requires spatial context and schedule reconciliation.
Retain the raw text as well as a normalized room ID and proposed finish code. If a hatch indicates tile but the room schedule indicates resilient flooring, preserve the conflict for review. Do not resolve it by choosing the most convenient source or the highest model score. Record the document authority agreed for that project and keep the unresolved state until a reviewer confirms it.
Open-plan spaces need finish zones independent of room polygons. A lobby may have an entrance mat, tile circulation strip and carpeted seating area. Split those areas along the documented finish boundary. A room-level label is a useful locator; it is not permission to apply one material across the entire polygon.
Read general notes as quantity rules with a source
A small general note can change more quantities than a large hatch. Look for instructions governing where floor finish stops, whether it continues behind casework, tile starting points, full-size courses, material limits and references to other sheets. Capture applicability: a note can be general, local to a view or superseded by a later instruction.
For example, a hypothetical note could stop flooring at a millwork toe space. That is a different instruction from deducting every cabinet symbol or continuing the entire finish under fixed casework. Link the note to affected zones, retain the original boundary and show the reviewer which deduction changed. Do not turn one project’s rule into a default for every future set.
The same discipline applies to dimensions. Calibration checks support estimating geometry, but drawing notes may restrict scaling or require clarification of missing dimensions. Distinguish a quantity approximation from information authorized for construction. Conflicts or absent dimensions need the project’s clarification process; an AI overlay does not resolve them.
Calibrate geometry and state the measurement basis
Bluebeam’s area-measurement documentation describes closed polygon measurements, cutouts and setting page scale before measurement. Those are useful reference operations for checking a proposed AI polygon. They do not establish that an extracted boundary is correct or which deductions a flooring contract requires.
Verify a known dimension at the intended view scale and check another dimension where possible. A PDF can be resized, contain multiple scales or include a scan with distortion. Keep units and calibration evidence with the run. If the drawing cannot support a scale, return an unmeasured zone for review rather than a precise-looking area.
Agree whether the quantity is a geometric net finish area, a contractual bill quantity or a procurement quantity. RICS identifies NRM2 as detailed measurement for building works; where a contract uses it, check the applicable edition and work-section rules. This guide does not prescribe universal deduction thresholds or claim its simplified example is an NRM-compliant bill.
References: Bluebeam Revu20: area measurements, page scale and cutouts · RICS: New Rules of Measurement and document context
Separate net area from exclusions and unknown scope
Save the outer polygon and each deducted polygon separately, with its reason. Columns, voids, built-in fixtures and equipment bases may have different scope treatment. Whether flooring continues under a cabinet is a specification decision; a symbol that resembles cabinetry cannot settle it. Do not deduct furniture simply because it appears on a plan.
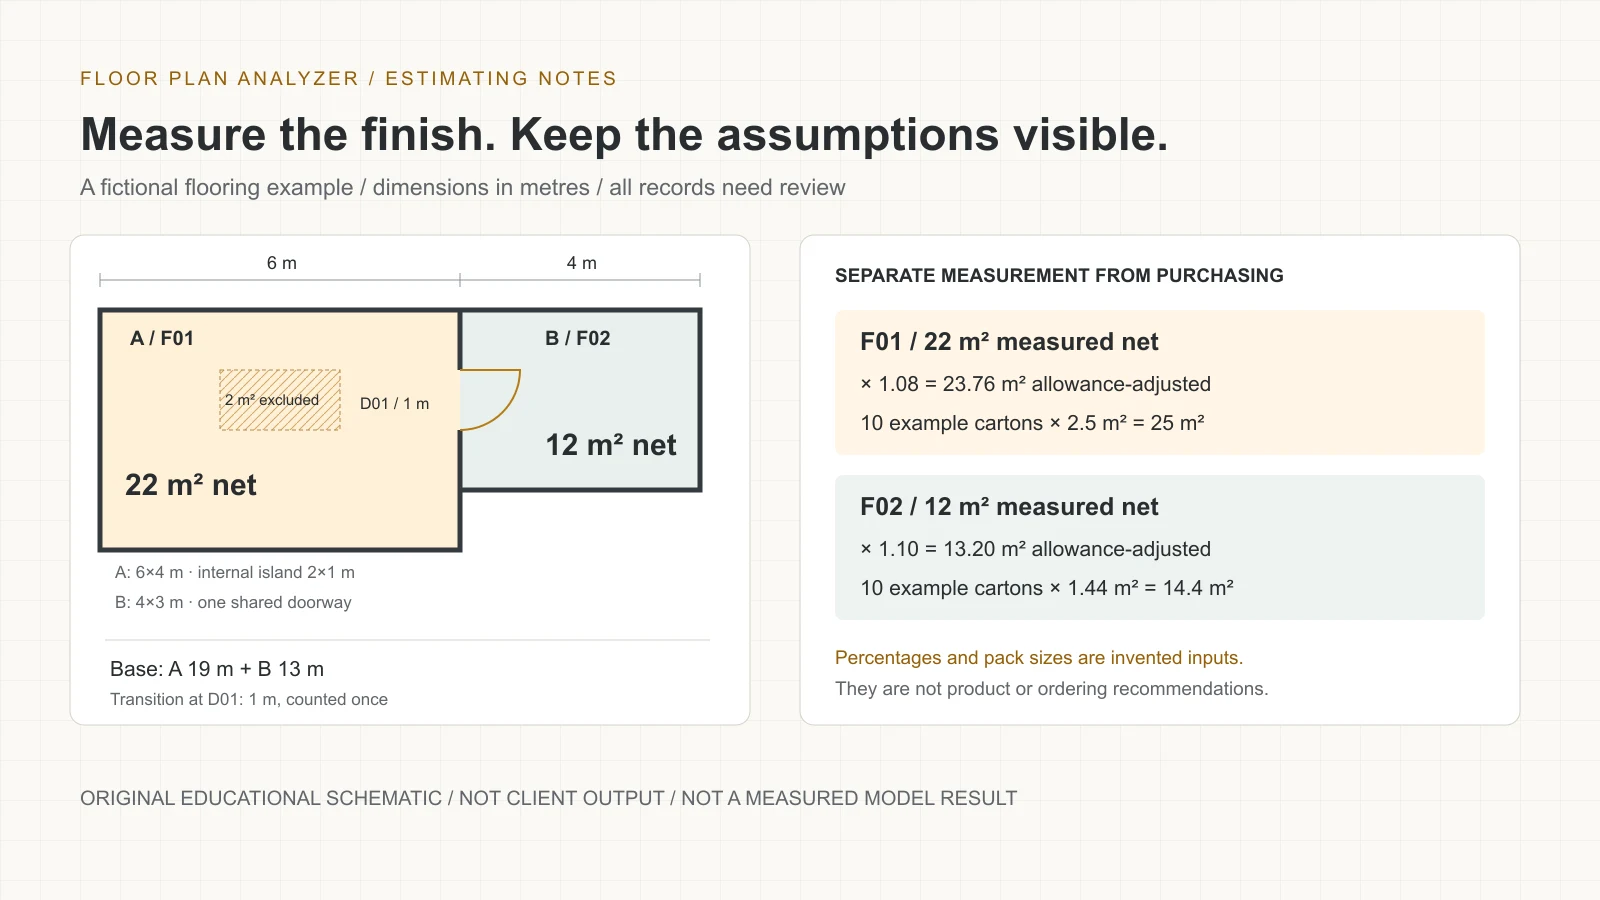
For the worked example below, the reviewer’s hypothetical instruction excludes a two-square-metre internal island from flooring but adds no base around it. That is an explicit teaching assumption, not a general rule. In a real project, mark the instruction or detail that authorizes each deduction.
Record incomplete coverage. A zone hidden by a scan defect, cropped page or missing finish boundary is not zero area. If part of a room is unresolved, show that exception in the register and block final release for the affected scope. A total without a completeness indicator can look more certain than its evidence permits.
Scope wall tile, backsplashes and exposed-edge trims
A flooring contractor’s package may also include wall tile, backsplash areas, resilient base, grout, sealers and tile trims. Confirm the actual subcontract boundary. A floor plan can locate a room without showing the length, height or termination of its tiled walls. Follow its elevation symbols and enlarged-view references before assigning quantities.
Break wall finishes into faces and bounded regions, with orientation, height source and treatment of openings. Check returns, reveals, outside corners, exposed ends, backsplashes and tile behind or above casework. Use a ceiling plan only when its height information is applicable; a full room height is not automatically the tiled height.
For a purely fictional calculation, a backsplash face 4 m long by 0.6 m high is 2.4 m² before agreed deductions. Its top edge might be 4 m, but side returns or exposed edges require their own detail and cannot be derived from area alone. This separate example is not included in the downloadable two-room floor totals.
A trim brand name can be a useful search term, but it is not a complete selection. Record profile type, tile/setting-bed relationship, finish, colour and applicable edge or corner. Schluter’s sizing guidance relates profile choice to tile thickness and setting material. Use the selected system’s current instructions and confirm a missing profile instead of silently adding a generic trim.
References: Schluter: selecting tile-profile size
Measure wall base and transitions as distinct items
A closed floor polygon supplies a perimeter, but that perimeter is not automatically the base quantity. Agree deductions at doorways and treatment of casework, glazed partitions, integral coved flooring, columns and changes in base type. Keep base material and height separate from the floor finish code when the schedule distinguishes them.
Store transition records by opening or boundary ID, with the two adjoining finish zones and the specified profile. Deduplicate shared boundaries before summing. A doorway between carpet and tile might need a particular detail; two rooms sharing the same finish may not need the same item. The plan alone cannot establish a missing threshold product.
Stairs, landings, ramps and vertical risers need their own scoped geometry and installation details. Do not force them into the same two-dimensional floor-area calculation. Flag them as separate work when the required sections or product rules are absent.
Capture the build-up on both sides of a transition
A material change on the plan locates a possible transition; the detail determines what must be priced. Link the opening or boundary to its profile, adjoining finish codes and assembly information. Two products with different thicknesses may need a coordinated build-up, reducer or preparation item rather than a line called transition with no specification.
Preserve notes about colour matching, threshold location, membranes and coordination as linked scope items. A brand, profile model or size may differ by condition. Do not apply a generic threshold dimension or accessibility claim to the project; use the applicable detail and obtain qualified clarification where the design is incomplete.
Keep transition length separate from base length and deduplicate the same physical boundary across adjoining rooms. A quantity register should make it possible to trace the selected detail and both materials without reopening the entire package.
Keep waste and carton rounding outside the measured net area
Begin with the reviewed net quantity, then apply a documented planning assumption for the particular product and layout. Cutting loss, pattern alignment, room shape, direction, reuse of offcuts and spare stock are different considerations. A flat percentage can be a budget assumption; it is not proof of an installable layout or an industry-wide standard.
For fictional F01, an 8% allowance changes 22 m² into 23.76 m². With an invented 2.5 m² carton coverage, rounding 23.76 ÷ 2.5 upward gives 10 cartons, or 25 m² purchased. For fictional F02, a 10% allowance changes 12 m² into 13.2 m²; invented 1.44 m² cartons require 10 cartons, or 14.4 m² purchased. These percentages are teaching inputs, not recommendations for either finish.
Keep the allowance-adjusted area and rounded purchase area in separate columns. Do not call both waste: carton rounding is an additional purchasing effect. Combine zones only when they share the same actual product, format, batch constraints and ordering policy. Rounding every small room independently can differ from rounding an approved grouped order.
| Finish | Reviewed net | Illustrative allowance | Before pack rounding | Example packs |
|---|---|---|---|---|
| F01 | 22m² | 8% | 23.76m² | 10×2.5 =25m² |
| F02 | 12m² | 10% | 13.20m² | 10×1.44 =14.4m² |
Roll goods and patterned layouts need a different purchasing calculation
A net area plus a percentage does not lay out rolls. A useful roll-goods workflow needs roll width, allowed seam positions, pile or pattern direction, repeat dimensions and cut lengths. Two shapes with the same area can require different purchased lengths. Keep a cut plan or an unresolved layout requirement alongside the geometric quantity.
Manufacturer guidance belongs in this decision. Interface’s referenced EMEA carpet-tile guide includes planning and installation-direction instructions and identifies product-specific considerations. It is a carpet-tile guide with a stated revision, not a source for universal flooring waste or roll widths. Check the current instructions for the selected product and region before releasing an order.
For modular finishes, confirm product dimensions, layout method, starting lines, border cuts and compatible batch requirements. AI can help propose geometry and classify evidence; the installer or estimator still needs to approve an ordering strategy consistent with the specification. Keep unconfirmed product attributes unknown rather than filling them from a similar item.
References: Interface EMEA: Carpet Tile Installation Guide, revision27April2023
Price ancillary materials from the actual assembly
Grout, setting materials, sealers, waterproofing and crack-isolation layers need product and assembly information, not just one floor-area total. Verify which finish code and surface each applies to. A wall-tile grout selection should not automatically be applied to every tiled surface or substituted with another product from the same manufacturer.
As an example of product-specific data, CUSTOM’s Fusion Pro technical sheet presents coverage by tile dimensions, thickness and joint width. It is a reference for that product, not the selected grout for the fictional plan or the private project documents reviewed for this guide. Use the actual specified product’s current coverage and limitations when calculating quantities.
Carry unconfirmed joint width, grout product, substrate condition or preparation depth into the exception log. Keep measured surface, calculated consumption, supplier packaging and pricing separate. Similar-looking materials can have different coverage, compatibility and labour requirements.
References: CUSTOM: Fusion Pro TDS-242, product-specific coverage tables
Do not infer substrate readiness from a floor plan
Removal, repairs, levelling, moisture-related work, primers and adhesives can dominate a flooring scope while remaining invisible in a floor polygon. Document the required preparation and testing information separately. A drawing extraction cannot verify an existing substrate’s condition or replace site investigation.
Keep provisional items clearly marked, with the evidence or survey needed to resolve them. Avoid creating adhesive or levelling quantities from an unsupported generic coverage rate. Product selection, substrate condition and manufacturer instructions determine those calculations. The estimate should explain which items are measured, assumed, excluded or awaiting confirmation.
Create a qualification and clarification log before the bid
Summarize what was reviewed, drawing issue and date, measured scope, material-verification references and missing inputs. State whether a pattern was used only for quantity planning and whether shop drawings or installation layouts remain outside the deliverable. An estimate based on a provisional layout should not be presented as an approved setting-out drawing.
For each question, record location, source reference, requested clarification, cost or quantity impact, responsible reviewer and disposition. Distinguish an exclusion from an allowance and an unresolved question. A blank specification field means evidence is missing; it does not show that there are no specification requirements.
The additional scoping CSV below contains fictional question types rather than client information. Use it alongside the quantity example to design a review queue. All entries need review, and no illustrative disposition authorizes construction or purchasing.
| Gap | Useful next action | Avoid |
|---|---|---|
| No separate room-finish schedule | Check plan indicators and retain the source type | Inventing a recovered room table |
| Pattern not specified | Ask for direction or record an approved provisional assumption | Copying the manufacturer’s default visualization |
| Wall extent unclear | Trace elevation/section or issue a clarification | Using full room height by default |
| Trim detail absent | Identify the edge and request profile information | Picking a brand-compatible trim without review |
| Thickness conflict | Compare selected products and transition build-up | Treating all same-category finishes as equal thickness |
References: Download the fictional flooring scoping and clarification CSV
Export a register your estimator can challenge
A useful row contains project, level, revision, source page, room or zone ID, finish code, units, gross area, exclusions, net area and review status. Add base and transition references without concealing their separate measurement rules. Preserve a link or locator back to the exact source region and the instruction behind each deduction.
Map these records to your workbook columns rather than rebuilding the estimator’s commercial logic without agreement. Keep measured fields separate from waste, pack size, unit rates and labour. Unknown values should remain blank with an explanation, not become zero through a spreadsheet import. Make formulas and rounding policies explicit so a reviewer can reproduce them.
The downloadable CSV is an editable teaching register with numeric values, not embedded spreadsheet formulas. It includes two room rows and one transition row. Source-page labels refer to the invented example, not actual tender documents. Validate field types and formulas when moving it into your own Excel template; no native Excel import is claimed here.
Turn reviewed quantities into a complete commercial estimate
Group accepted quantities by the exact product, location, phase and installation method. Apply approved cutting/layout rules, pack or roll rounding and separately specified spare stock. Obtain current supplier inputs for material, freight and availability; no live price or stock claim is made in this article.
Build labour and ancillary lines from the agreed assembly and access conditions. Track demolition, protection, preparation, mobilisation, sequencing and exclusions where they belong to the scope. Separate measured quantities from provisional allowances, rates, markups, taxes and tender terms. This lets a reviewer understand whether a changed bid came from geometry, material selection or a commercial assumption.
Issue an estimate only after the appropriate reviewer signs off its evidence and qualifications. Preserve the scoped package, quantity version and pricing version used. When an addendum arrives, identify affected finish zones, materials and details, then remeasure or reprice the relevant lines. A newer drawing should not silently overwrite the basis of an already issued estimate.
Validate revisions and pilot acceptance before relying on totals
Compare a representative sample against a checked reference, including open-plan finish splits, islands, missing schedule rows, mixed scales, scans and addenda. Measure missed zones, extra zones, wrong finish assignments, area differences, duplicate transitions and reviewer corrections. Keep related project revisions together when separating tuning and evaluation samples.
Test the handoff as well as the detector. Can a reviewer trace the 22 m² result to its 24 m² outer polygon and 2 m² deduction? Does an unresolved finish code block a material order? Does the shared doorway appear only once in transitions? Does a new revision preserve prior decisions as history rather than silently mixing geometry and schedules?
Agree acceptance criteria from the cost and consequences of errors, then measure the pilot. No accuracy, turnaround or savings figure in this guide is a promise for your drawings. Release reviewed quantities in a bounded scope first; expand only when the evidence and exception workflow support the next material or document type.
| Check | Expected evidence | Hold release when |
|---|---|---|
| Area arithmetic | Outer polygons and authorized deductions | Boundary or scale is unresolved |
| Finish assignment | Plan/legend/schedule agree or conflict resolved | Sources contradict without disposition |
| Base scope | Boundary type and opening deductions recorded | Base type or extent is missing |
| Transitions | Unique shared-boundary IDs | Same threshold is counted twice |
| Procurement | Product, allowance and pack rules approved | Assumed coverage is presented as fact |
Bring a plan, a finish schedule and your workbook
For a feasibility discussion, bring an authorized sample set, the selected issue and a completed example of your flooring register. Include one awkward package with mixed finishes or an unresolved deduction. Agree what the model proposes, what the estimator reviews and which fields enter the commercial workbook.
A useful first engagement can cover page selection, OCR, finish-zone geometry, schedule links and a reviewable export for specified materials. Preparation, roll layout, procurement optimization and pricing should be scoped explicitly if required. Leave your work email above to discuss that workflow; after enquiry submission you can choose an optional discovery-call time and arrange secure sample sharing.
Frequently asked questions
Can AI identify flooring materials from hatch patterns?
It can propose a classification using the project legend, text and schedule. A hatch is not a universal material code. Conflicting or missing evidence needs reviewer disposition.
Is room area the same as the material order?
No. Net area is a measured quantity. Ordering also depends on the selected product, cutting layout, allowance, pack or roll rules and any separately specified spare stock.
What waste percentage should I use?
Use an approved assumption for the actual product and layout, supported by installer and manufacturer requirements. The 8% and 10% in this guide are invented arithmetic examples, not industry recommendations.
Does perimeter equal skirting or wall-base length?
Only when the agreed scope matches that boundary. Doorways, casework, integral coves and different base types can require separate treatment and evidence.
Can the output go into Excel?
A custom engagement can map reviewed records to your template. Agree units, formula preservation, unknown values, rounding and source fields, then validate the export with your estimator.
Does a floor plan establish preparation quantities?
Not completely. Existing substrate condition and required preparation may need surveys, tests and specifications. Keep provisional work distinct from measured finish areas.
Is this a self-service flooring subscription?
Floor Plan Analyzer is AxcelerateAI’s specialist drawing-intelligence practice. We fine-tune models and build custom workflows around your documents and estimating requirements.
Is a finish schedule the same as a room-finish schedule?
No. A material schedule describes the finish products; a room-finish schedule assigns finishes to rooms and sometimes individual walls. Room indicators embedded on a plan are another evidence source and should remain identified as such.
Why review elevations and ceiling plans for a flooring package?
The trade scope may include wall tile, backsplashes or bases. Elevations define their extent, and applicable ceiling information can help establish heights. Confirm that the information actually governs the measured surface.
Can a manufacturer website fill in a missing project pattern?
It can verify supported product options but does not select the project’s design. Record an unresolved question or an explicitly authorized estimating assumption.
Does this article describe a delivered AI deployment for an estimator?
No. It explains a proposed custom engineering workflow and estimating controls. The examples are educational; no client deployment, measured accuracy, savings or priced project outcome is claimed.
References and illustration notes
Sources support the terminology and interpretation notes cited above. Worked examples and diagrams are our own educational material, not client drawings or measured project results.
- Bluebeam Revu20: area measurements, page scale and cutouts
- RICS: New Rules of Measurement and document context
- Interface EMEA: Carpet Tile Installation Guide, revision27April2023
- Shaw Contract: Process Tile product dimensions and installation-method examples
- Schluter: selecting tile-profile size
- CUSTOM: Fusion Pro TDS-242, product-specific coverage tables